
Many homeowners choose engineered wood flooring because of its strength, attractiveness, and ability to withstand changes in the climate. Nevertheless, it is susceptible to damage, especially dents, much like any other flooring material. Dents in engineered wood flooring can occur due to heavy furniture, dropped items, or even high heels. While repairing these dents might seem like a daunting task, it’s something you can often handle on your own with the right approach and tools. In this article, we’ll guide you through the process of engineered wood flooring dent repair and provide data-backed insights to ensure your repairs are effective and long-lasting.
Understanding Engineered Wood Flooring Dents
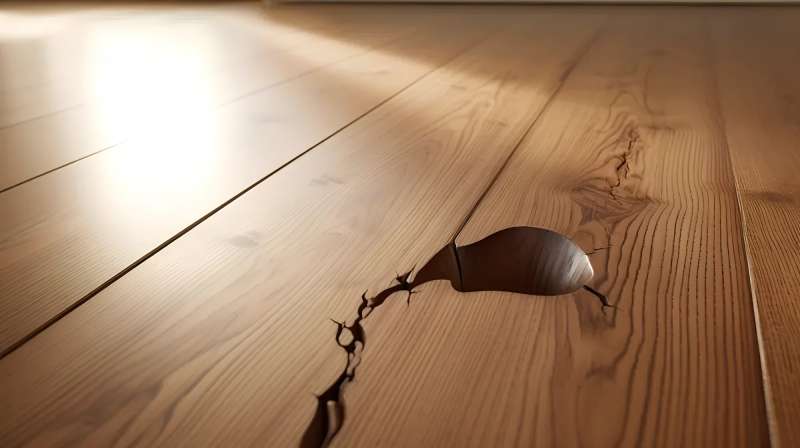
Before diving into repair methods, it’s essential to understand why engineered wood floors dent in the first place. Engineered wood flooring is made up of multiple layers, typically a top layer of hardwood veneer glued to a high-density core (such as plywood or HDF). While the top layer is hardwood and offers natural beauty, it is still susceptible to surface damage like dents and scratches.
According to a study on floor durability, hardwoods like oak and maple, commonly used in engineered flooring, have Janka hardness ratings of around 1,200 to 1,500 pounds-force (lbf), making them relatively hard but not impervious to dents. Even with these numbers, dropping heavy objects can easily cause localized damage, especially on thinner veneer layers (less than 3mm).
Types of Dents and Their Severity
The size and depth of a dent in your engineered wood flooring will determine the best method for repair. Dents generally fall into two categories:
- Minor Dents: These are shallow and may not penetrate the entire veneer. Simple wood fillers or heat and moisture can often be used to repair minor dents.
- Major Dents: These are deeper and may penetrate through the hardwood veneer to the core layer. Such dents may require more extensive repairs, including replacing the affected plank.
Data-Based Insights: Thickness Matters
- Engineered wood floors with top layers between 3 mm to 7 mm can withstand more aggressive repair methods, such as sanding or filling.
- Thinner top layers (1 mm to 2 mm) can be easily damaged with too much sanding, making steam and filler methods more appropriate.
Assessing the Damage
Before deciding on the best repair approach, assess the severity of the dent. Deeper dents might need to be filled and refinished, while minor dents can frequently be fixed with easy methods like steam and water. Knowing whether your floor has a wear layer of 3 mm or more can help you decide on the right repair method.
Key Metrics to Consider
- Dent size: Take measurements of the dent’s width and depth.
- Minor dents are typically less than 1/8 inch deep.
- Location: Dents in high-traffic areas may need more robust repairs, as they are subject to continued wear and tear.
- Type of finish: Some finishes may make it harder to blend repairs, especially with lacquer or polyurethane.
Repairing Minor Dents in Engineered Wood Flooring

Method 1: Using Heat and Moisture
For shallow dents that don’t break the surface of the wood, you can use a combination of heat and moisture to raise the dent and restore the wood to its original shape. This method works because the wood fibers compress under pressure, and heat and moisture help them expand back to their original form.
Materials Needed:
- Iron
- Clean cloth
- Water
Steps:
- Clean the area: Ensure the dented area is free of dust and debris.
- Wet the cloth: Lightly moisten a fresh cloth with water, but not so much that it gets soaked.
- Apply the cloth: Cover the dent with a moist towel.
- Heat the area: Press your iron onto the damp cloth for 10 to 15 seconds on a medium heat setting.
- Repeat if necessary: If the dent is still evident, check it and repeat the procedure until it rises.
Data Insight: According to research on wood behavior, this method works best on woods with higher moisture content, as wood swells with water exposure. For engineered wood, using a veneer with 5-10% moisture content is optimal for repair, as it balances swelling and prevents further damage.
Method 2: Wood Filler for Surface Dents
For dents that haven’t penetrated through the veneer but have left visible damage, using wood filler can be an effective way to restore the appearance of your flooring.
Materials Needed:
- Wood filler (color matched to your floor)
- Putty knife
- Sandpaper (220 grit)
- Wood finish (optional)
Steps:
- Clean the area: Clear the dent of any dirt or debris.
- Apply filler: Using a putty knife, fill the dent with the wood filler. As the filler dries, it may shrink, so make careful you overfill a little.
- Smooth the area: Once the filler has dried (typically within 30 minutes to an hour, depending on the product), lightly sand the area until it’s smooth and level with the surrounding surface.
- Finish: If needed, apply a wood finish or sealant to match the surrounding flooring.
Data Insight: High-quality wood fillers can resist compression up to 500 lbf per square inch (PSI), ensuring they hold up well against foot traffic and further impact. This makes wood filler ideal for engineered flooring repairs in high-traffic areas.
Repairing Major Dents in Engineered Wood Flooring
For deeper dents that penetrate through the hardwood veneer and expose the core or cause delamination, more extensive repairs may be necessary.
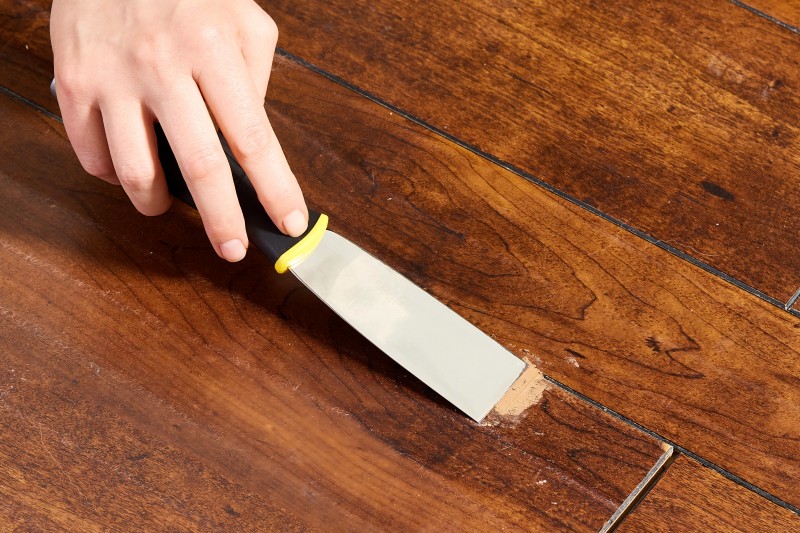
Method 1: Replacing the Damaged Plank
If a dent is too deep to be repaired with filler or heat, you may need to replace the entire plank. While this is more labor-intensive, it’s a surefire way to restore the look of your floor.
Materials Needed:
- Replacement plank (matching your floor’s design and thickness)
- Circular saw
- Adhesive (if using a glue-down installation)
- Chisel
- Rubber mallet
Steps:
- Mark the damaged plank: Use a pencil to outline the damaged area.
- Remove the damaged plank: Using a circular saw, carefully cut out the damaged plank along the marked lines. Be sure not to cut into the subfloor.
- Clean the area: Remove any remaining adhesive or debris in the cut-out section.
- Install the replacement plank: Apply adhesive if necessary, and fit the replacement plank into the space.
- Secure and finish: Use a rubber mallet to gently tap the new plank into place. Before walking into the area, let the glue set as directed by the manufacturer.
Data Insight: Engineered wood planks typically have a wear layer thickness of 2mm to 6mm. Replacing planks with a similar wear layer ensures the repaired section maintains durability and performance comparable to the rest of the floor.
Method 2: Using a Wood Patch for Deep Dents
If replacing a plank isn’t an option, using a wood patch can be a suitable alternative for fixing deep dents.
Materials Needed:
Wood patch (pre-finished or unfinished)
Putty knife
Sandpaper (various grits)
Wood stain (if unfinished)
Wood finish
Steps:
- Prepare the area: Clean and sand the area around the dent.
- Apply the wood patch: Press the wood patch material into the dent, ensuring it fills the space completely.
- Sand smooth: Sand the area to match the surrounding floor’s surface level after the repair has dried.
- Stain and finish: If the repair isn’t finished, integrate it in with the rest of the floor by applying a matching wood stain and finish.
Data Insight: Wood patches can withstand impact forces of up to 300 PSI after proper curing, providing a strong and durable solution for deeper dents that don’t justify plank replacement.
Preventing Future Dents
While repairing dents in engineered wood flooring is achievable, preventing future damage is even better. You can take the following precautions:
- Use Furniture Pads: Place felt pads or rubber caps under heavy furniture to distribute weight and prevent dents from forming.
- Avoid High Heels: High heels can exert pressure of up to 1,000 lbf per square inch, easily causing dents on even the hardest of wood floors. Encourage the use of soft-soled shoes in areas with engineered wood.
- Rugs and Mats: In high-traffic locations like hallways and doorways, placing area rugs or mats can greatly lower the chance of denting.
- Regular Maintenance: Keep your engineered wood floors clean and free of debris that can scratch or cause dents over time. A regular cleaning routine with a soft-bristle broom or vacuum is recommended.
Data Insight: Research on wood flooring wear indicates that areas with rugs or mats experience 40% less surface damage over time compared to unprotected sections, particularly in high-traffic zones.
Conclusion
Repairing dents in engineered wood flooring is a task you can tackle yourself, provided you have the right tools and a little patience. Whether you’re dealing with a minor dent or a more significant issue, the methods described here offer effective solutions to restore your floor’s appearance and integrity. By understanding the type of dent and using appropriate repair techniques like heat and moisture, wood filler, or plank replacement, you can ensure your engineered wood flooring stays beautiful for years to come. Moreover, taking preventative action will help shield your floors from future harm and maintain their best possible condition.
By following the guidance and tips in this article, you’ll be well-prepared to handle any dents that may appear on your engineered wood floors, maintaining the value and aesthetics of your home.